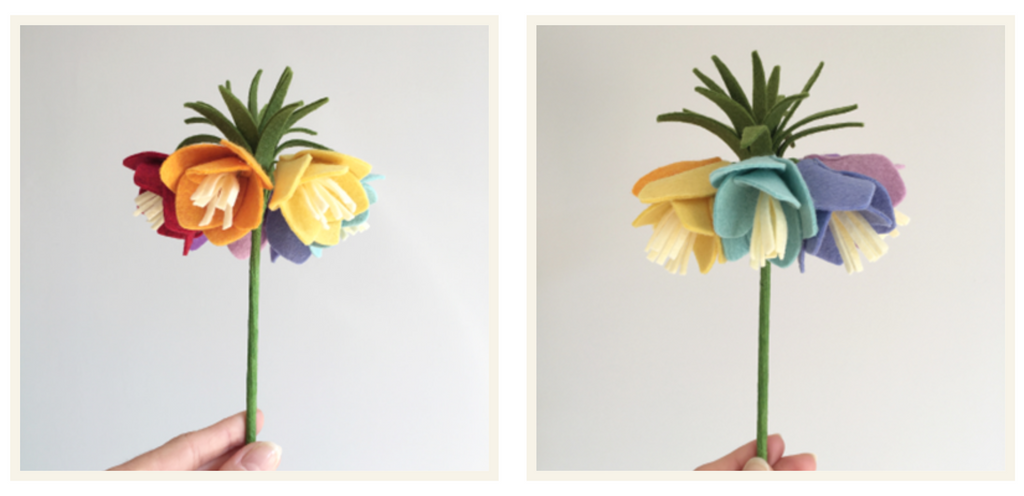
Felt Rainbow Imperial Fritillary

I am always mesmerised by Crown Imperials when I see them popping up in springtime. Everything from their tall strong stems to their bushy heads of rich orange flowers and leafy green crowns make them a real sight to behold.
I began this project with a life-like version of this imposing flower, in orange with a brown flower stem. But I couldn't stop there! This one was screaming to be made in a rainbow of colours - another great felt stash buster and such a satisfying result.
RAINBOW IMPERIAL FRITILLARY
TOOLS AND MATERIALS:
- Felt sheets or scraps in a mix of colours, including a piece of green felt at least 15cm long and 5.5cm wide
- Paper/freezer paper for printing the templates
- Template sheet (PDF)
- Scissors
- 8 florist wires (I used 19 gauge, 30cm long)
- Florist tape (green or brown)
- Glue gun
- Wire cutting craft pliers
- Round-nosed craft pliers
Start by choosing the colours for your flowers. My Rainbow Fritillary is made up of seven separate flowers and one central leaf stem. For each flower, you will need:
- 1 centre strip (I used cream felt for these)
- 6 petals (I made each flower in a different colour)
- 1 wrapped wire stem (see next step)
For the central leaf stem, you will need:
- 1 leaf stem strip (in any shade of green felt)
- 1 wrapped wire stem (see next step)
Next, print and cut out the template pieces and then cut your felt shapes. The template sheet is full size when printed on A4 paper. If you're using freezer paper, remember to print onto the non-waxy side, then roughly cut around each shape before ironing onto your selected scraps of felt to cut out your shapes.
Now, wrap each of your florist wires with florist tape.
> VIDEO: HOW TO WRAP FLORIST WIRES
MAKING THE LEAF STEM
We'll start with making the leaf stem. Take the leaf stem strip and make cuts along the length, around three quarters deep and 8-10mm wide. Form one side of each cut section into a curve by cutting just in from the top corner* to the opposite bottom corner. *This gives a blunted rather than sharp point and will help stop your felt from getting fluffy.

Take one of the wrapped wire stems and glue it into place at one end of the strip; allow the glue to set before moving on. Now glue along the strip and roll it up; do this bit by bit so the glue doesn’t set before you reach the end.

MAKING THE FLOWERS
Take the centre strip and make cuts along the width, around three quarters deep and 3mm wide. Take one of the wrapped wire stems and glue it into place at one end of the strip; allow the glue to set before moving on.

Now glue along the strip and roll it up. Glue the bottom edge of one of the petals and pinch it into place just below the wrapped up centre strip on your wire stem.

Repeat with two more petals to give a single layer of three petals around the centre strip.

Attach the remaining three petals, placing each at the join between two petals from the first layer.

ASSEMBLING YOUR RAINBOW FRITILLARY
Gather your flowers into a bunch, with the leaf stem at the centre. If you’ve chosen to make your flowers in different colours, now is the time to make sure you have them arranged in the order you would like! The bottom of the flowers should sit above the base of the leaf stem, lining up approximately with where the cuts in the leaf stem begin.

Pinch the bunch of flowers at the base of the leaf, then begin wrapping florist tape here, pulling it tightly and at an angle to help it attach to the stems. Wrap it a few times in one place to get it going, and then continue wrapping the tape down the stem, stretching it as you go to make it tacky. Cut the tape when you reach the end of the stems.

The wire of the central leaf stem will probably sit lower and stick out at the bottom of the bunch, so you may want to use wire cutters to trim it.

Use round-nosed craft pliers to create a bend in each of the flower stems, just below the flower head, so the flowers point downwards.


If you've enjoyed this project, don't forget to share your makes with me on Instagram or Facebook using the hashtag #thehandmadefloristmakes and tag me @thehandmadeflorist.